
Multi-Stop Bus Tracker (and a tide display. and possibly weather.)
I live in SF, with some of the best public transit in the country. I would like to know when the next bus will be arriving at a stop near my house. Not just one stop, either: there are several bus lines that will all take me downtown, but they’re all served by different stops. I need a device that will ping the city’s API for all the bus stops near my house, and condense that into a list I can put on a small display somewhere. I don’t want to dedicate a whole computer to this task, so I need to build an embedded solution.
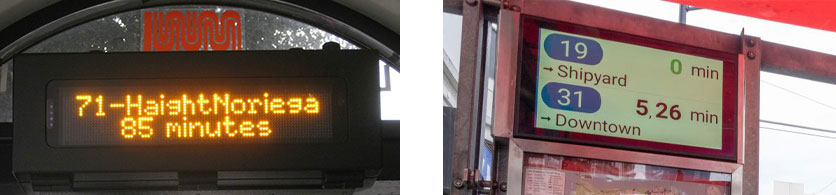
This is somewhat different than the displays actually found at bus stops around the city (above). By their nature, the displays at one bus stop do not track the arrivals at other nearby bus stops. It can be done, I just need the data. This can be done through the 511.org API. Given any bus stop in the city, this API will give me predicted times of arrivals each bus scheduled at that stop, its line number/letter, and its destination. There is a rate limit on this API of 60 requests per hour, but that only means I’m sending a request every 65 seconds.
But there are a few problems:
- The 511.org API only works with HTTPS.
- The API only gives me gzipped JSON. I need to decompress this on the device.
- I need to do this on an embedded device. I’m using a Pi Pico2W, simply because that’s the bullshit I’m currently on.
Previous work and initial steps
I started this project with just a Raspberry Pi Pico (with Ethernet) simply as a proof of concept that it’s possible to pull arrival data in an embedded device. Some reddit user built something similar with an ESP-32, but was confounded by the fact that 511.org only works with HTTPS, and the API only returns gzipped JSON. The solution for that project was to build a Node app to download and decompress the data. This is not an ideal solution.
There is another project that does something like this, using an ESP-8266. This project does not ping the 511.org API directly, but simply downloads data from nextbus. Again, the two key problems are not addressed. This uses a second server, and doesn’t interact with the ‘ground truth’ of the actual API data. Also the display on both of the above devices is really small.
The ideal solution should work even if there are only two computers left on the planet – the 511.org server, and this device. This means solving the problems of getting data over HTTPS and decompressing the JSON file. I should also use a good display for this, because I really hate how small those little I₂C displays are.
To solve these problems, I picked up a Pi Pico board with an Ethernet module tacked on. In my real job I’ve found this to be a great way to get data off a network, and the Pico should have more than enough RAM to store the decompressed JSON as well as a screenbuffer or two. The Pico with Ethernet board allowed me to move over to a PicoW board in the future, giving me WiFi connectivity.
Problem 1: HTTPS and Decompressing JSON
Getting data from the 511.org API presents two immediate challenges: the API requires HTTPS connections, and it only returns gzipped JSON data. This is an unusual requirement for embedded projects; most examples of accessing web APIs on microcontrollers use plain HTTP, and compressed data is rarely seen in embedded applications.
HTTPS was the easier of these problems to solve; the SSLClient library for Arduino handles the SSL/TLS handshake and encryption. The only tricky part was getting the correct SSL certificates in the right format. A web-based tool creates a trust_anchors.h file containing the certificates needed for SSL verification - you just input the domain name (api.511.org) and it generates the properly formatted certificate array that SSLClient needs. With the correct certificates in place, SSLClient manages the encrypted connection transparently.
Figuring out the payload was another matter entirely. At first, every response I was getting from the server was garbage, even when telling the server to send me uncompressed JSON. Looking at the hex dump of the data I was receiving told me another story.
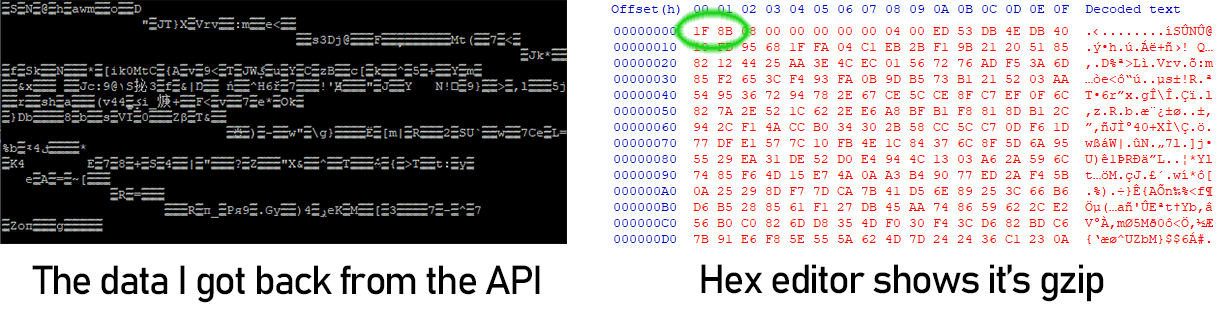
I can not tell you how many times looking at a hex dump has saved my ass.
The 0x1F 0x8B is the magic number for gzip encoding. Once I saw that, I knew I needed a library for decompressing gzip on an embedded platform. I found the miniz library, a portable library in C that handles the decompression. Even with this library, it’s tricky; I need to skip past the 10-byte header, extract the uncompressed size from the last 4 bytes, and decompress everything in between. I also need to manage the memory correctly with malloc() and free(), and no I haven’t learned Rust yet.
Problem 2: Organizing this data
The 511.org API gives me a lot of data for each bus stop - route numbers, destinations, arrival times, and current locations. But I need to track multiple stops at once, and merge all this information into something useful. This meant creating a data structure that could handle multiple stops and multiple arrivals at each stop.
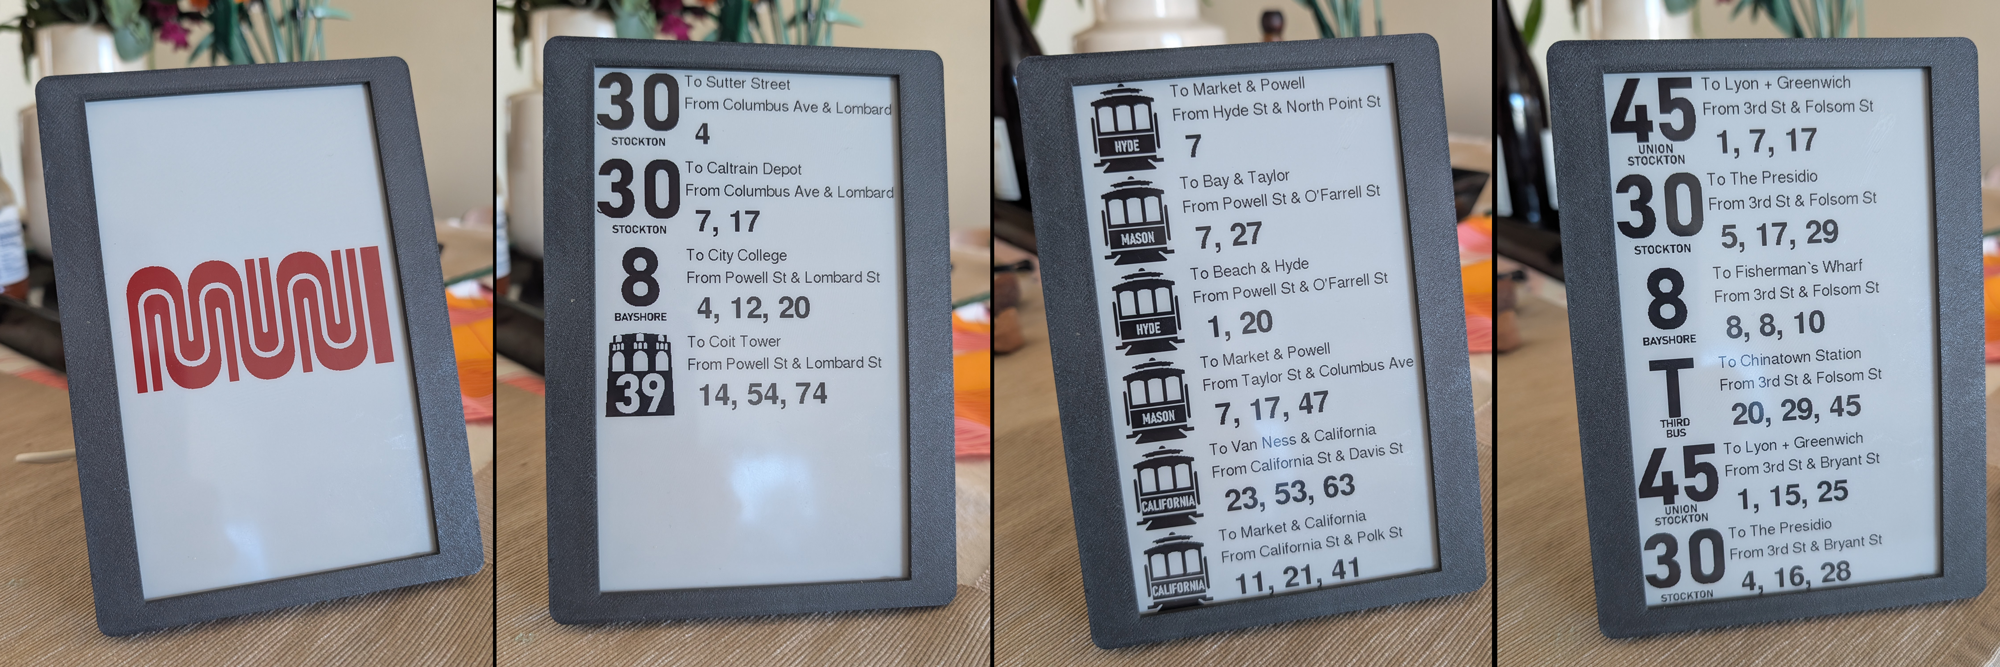
The solution I came up with uses a simple array of stop data structures. Each stop structure contains its stop code (a unique identifier for each bus stop) and an array of upcoming arrivals. Each arrival contains the bus line number, destination, arrival time, and stop name. The size of these arrays is fixed - I can track up to 20 arrivals per stop, which is more than enough for my needs.
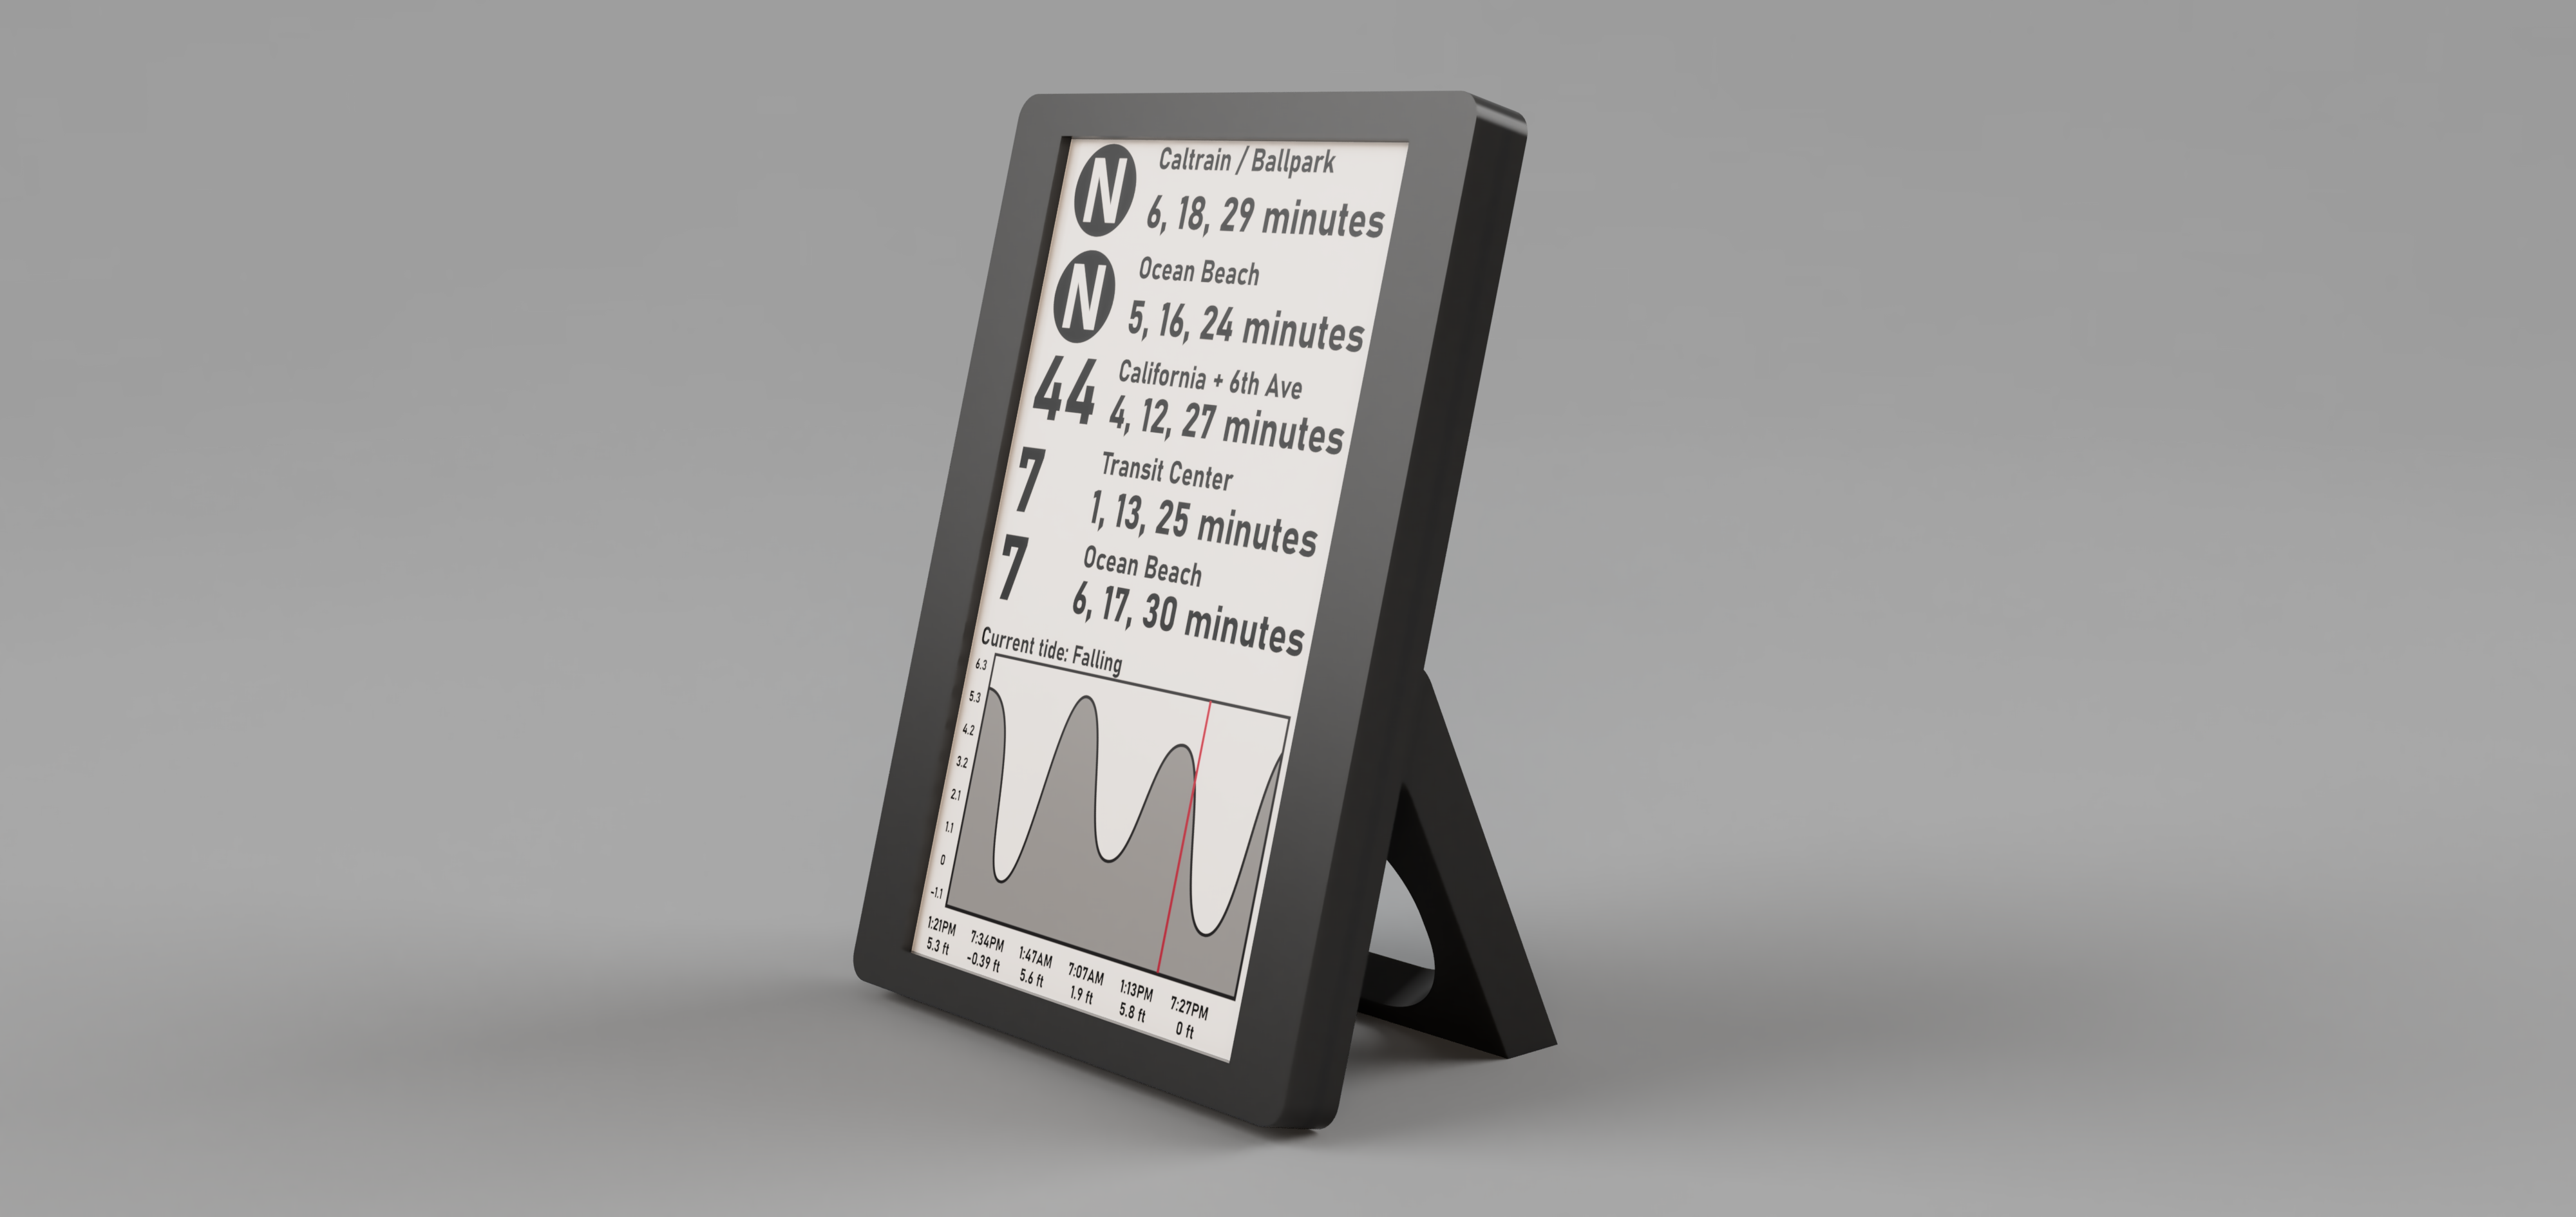
When new data comes in from the API, I clear out the old arrivals for that stop and fill in the new ones. There’s also a cleanup function that removes arrivals that have already passed. The most interesting part is how the display function handles all this data - it looks through all stops and all arrivals, groups buses going to the same destination, and creates a consolidated list of arrival times. For example, if the 48 bus is coming to the same stop in 5, 20, and 35 minutes, it shows up as one line: “48 Inbound in 5, 20, 35 minutes”. Pinging two stops means I can also get “28 to the Presidio in 2, 12, 23 minutes”.
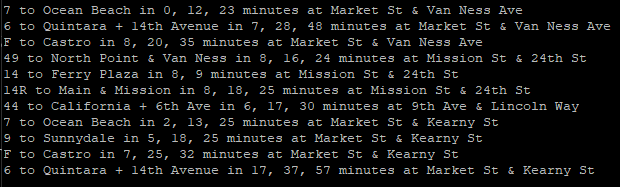
The above is the device pinging four bus stops ({“15696”, “15565”, “13220”, “15678”}) around Market and Van Ness. Each stop has several bus lines on it, and the code correctly displays the line, destination, and arrival time. This might seem like overkill for just checking bus times, but it means I can glance at the display and immediately see every bus that’s coming to any stop near my house, sorted by arrival time.
Problem 3: Let’s add a display!
This thing needs a display, something low power, too. I settled on an ePaper display, the Microtips MT-DEPG0750RWU790F30, a 7.5” display with a resolution of 480x800. There are a few things that brought me to this display: it has an on-chip framebuffer, which can vastly increase capabilities if you’re smart, and programmable waveforms for the eInk. This is a display meant for price labels in a grocery store, so the refresh rate isn’t great.
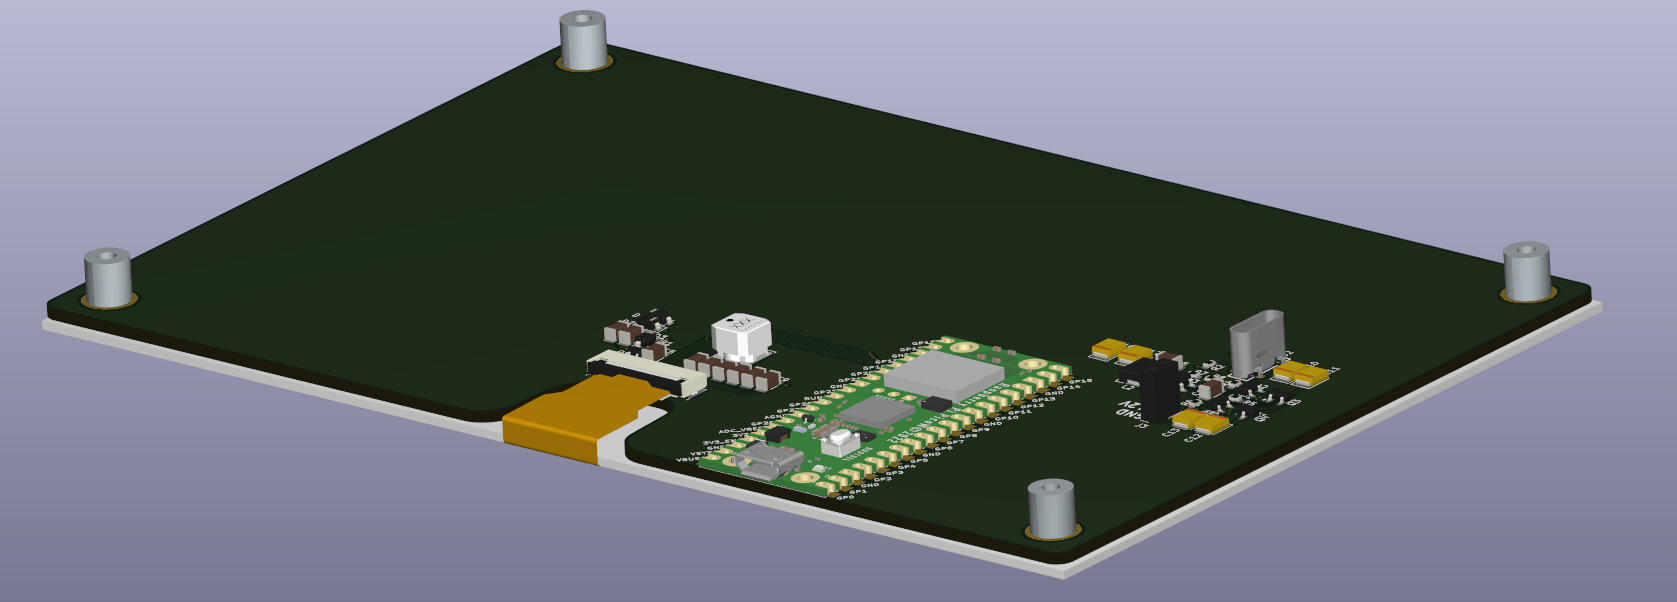
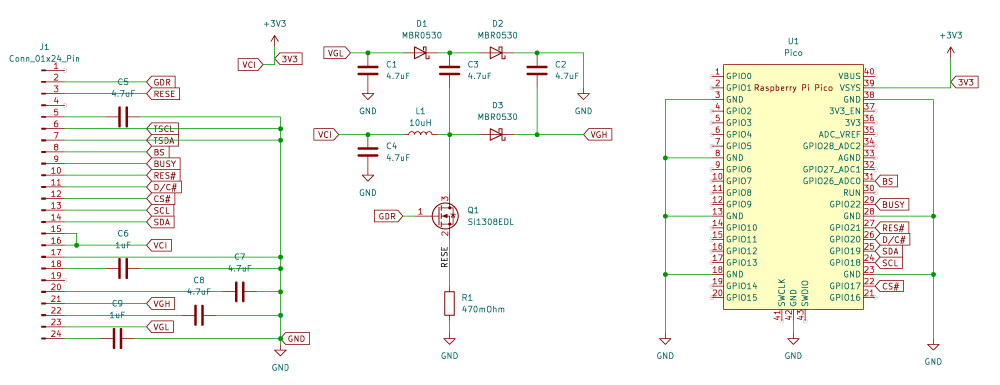
I whipped up a board in KiCad that would support this board. The panel driver circuit is ripped straight from the datasheet and drives the panel with SPI. In addition to that, I added a few solderable standoffs and a power circuit built around TI’s TPS560200, giving me 3.3V from 4.5V to 17V. There is a vertical USB-C (power only) on the board, because i envision this being something like a picture frame. There is also a ~12VDC power input ORed with the USB-C power input in case I ever want to install this inside a wall.
Writing the driver/library for the e-paper display proceeded as it usually does when I write a display driver – tearing my hair out and somehow it magically works.
E-Paper display pain points
This is not instructions on how to write a driver for an e-paper display. Instead, this is a log of what I found difficult. If you just want the code, it’s somewhere over in the github repo for this project.
Pain Points and Displaying Images
This code uses a small subset of the Adafruit GFX library for housekeeping tasks such as rotation and loading a set image format into RAM. This also gives me a stock font so error messages can be displayed on the screen. However, the actual display needs a much more robust and aesthetically pleasing solution.
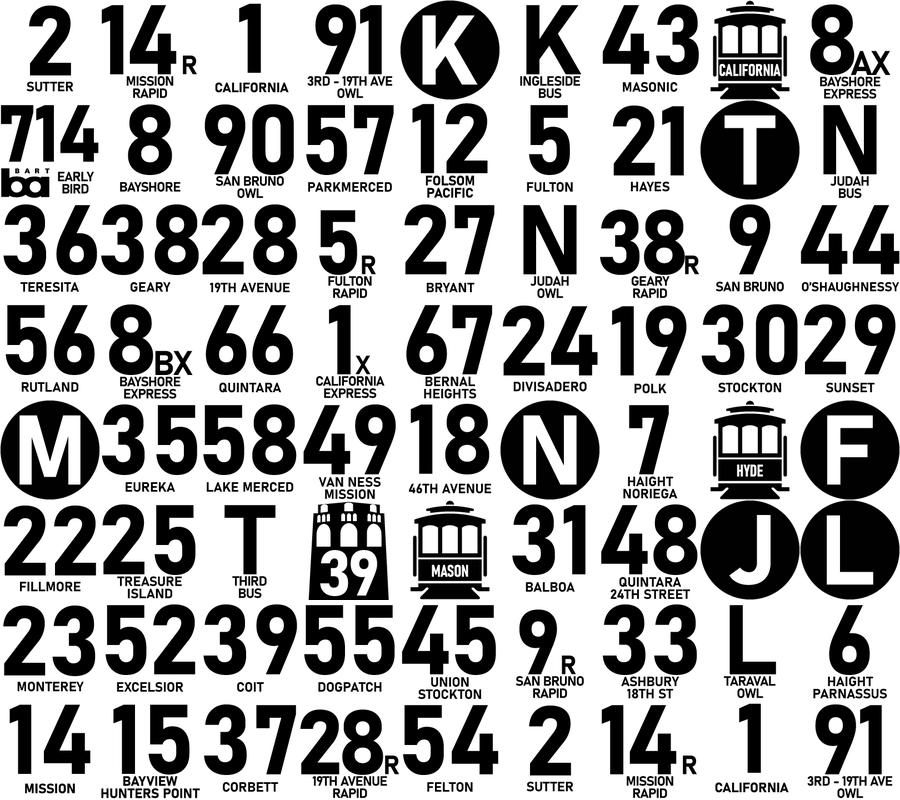
While standard bitmap fonts are good enough for the text, the bus routes themselves needed something extra. I created about seventy 180x180 pixel graphics for all of the bus and transit routes in SF. The design is Bahnschrift Bold, 175pt for the main letter/number, 24pt of supplementary text. Rail lines are in giant circles, cable cars are cute little cable cars, and the 39 Coit is Coit tower. I’m not happy with all of the route logos, but it’s a start:
I had a few pain points in developing this code, the first being what happens every time I write a display driver. Because I’m using this in a portrait orientation, the display was all cattywampus – up was right, left was down, and at one point the display was mirrored in the vertical axis. This is a pain, but I just had to work through it.
The second pain point was the lack of a partial refresh for the display. The core function of this display means it doesn’t change much. It’s just a list of bus lines, their destinations, a stop point, and a list of minutes until the bus arrives. Obviously the arrival time changes every 60 seconds, but the rest of the display will usually only change late at night when the busses stop running or early in the morning. A partial refresh for just the arrival times is the way to go.
Unfortunately, the display I’m using for this project doesn’t support partial refresh. I thought it did – why wouldn’t an e-paper display support partial refresh? The MT-DEPG0750RWU790F30 does not, however. But pinouts for 7.5” e-paper displays are all very similar, and I can use the same breakout board to test out other panels.
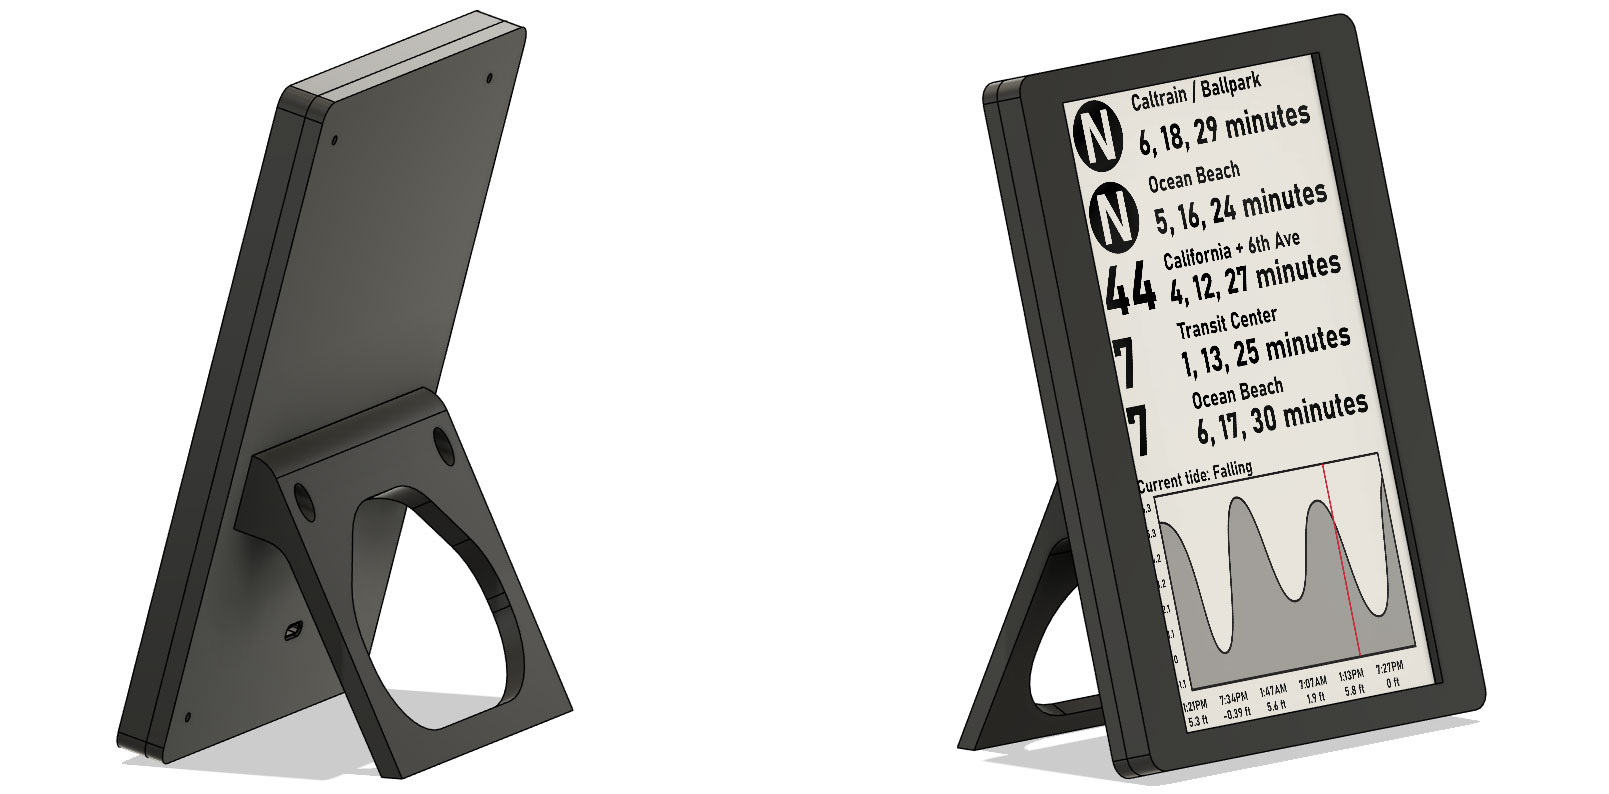
An enclosure
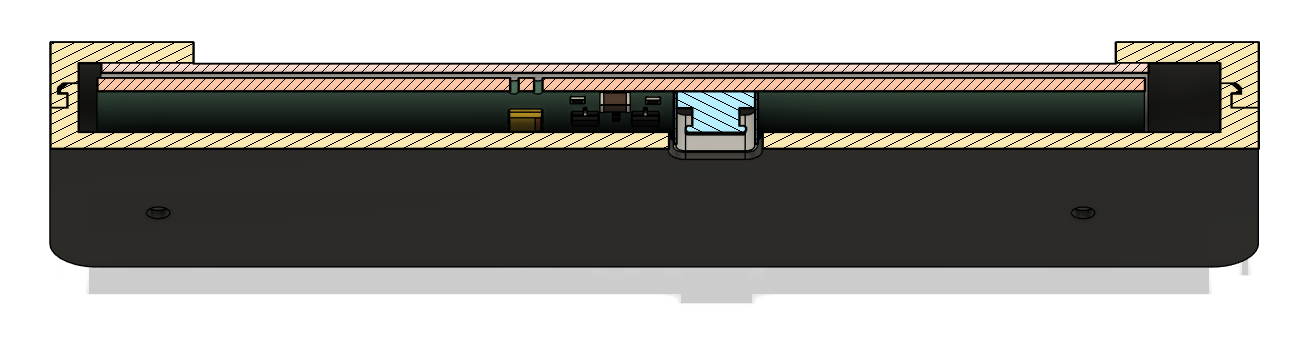
The enclosure is a 3-piece ordeal. The legs bolt onto the back with heat-set inserts installed in the back. The PCB/EPD assembly mounts to the back of the display with the solderable standoffs installed on the PCB. The front is a snap-fit assembly, with the geometry shown in the sectional diagram below.
These parts were 3D printed on a Prusa Mk4 in carbon fiber-filled PC. I’m only building one of these, after all.
back `