
A Minimum Viable Computer, or Linux for $15
This is a ‘Linux Swiss Army Knife’, offering maximum utility while still being able to fit in your pocket. Is it fast? No. Can it run a GUI? Also no. But it can run scripts, ping a server, toggle a few GPIOs, and interact with a USB device. This is a minimum viable computer that can:
- Run Linux. Just command line.
- Has a keyboard. No touchscreen display.
- Has a USB port. To connect to other things.
- Some sort of battery power, I guess.
That’s about it. Could you do all of this with a smartphone? Yeah, kinda, if you root prepaid Android phone, but even that would cost more than $30. I know I can build something cheaper.
Given the list of requirements, I know I need some sort of SoC, perferrably as cheap as possible. I need a keyboard of some sort, preferrably as cheap as possible. I need a screen, some sort of battery system, and some sort of storage. All preferrably as cheap as possible. I think I’ve cracked this problem, and I’ve come up with a computer that runs Linux and costs about $15 USD.
TL;DR, Gimme the specs:
- Allwinner F1C100s SoC
- ARM926EJ-S CPU @ 533 MHz
- 32 MB DDR (64 MB with pin-compatable F1C200s)
- Runs Linux! A recent version of Linux!
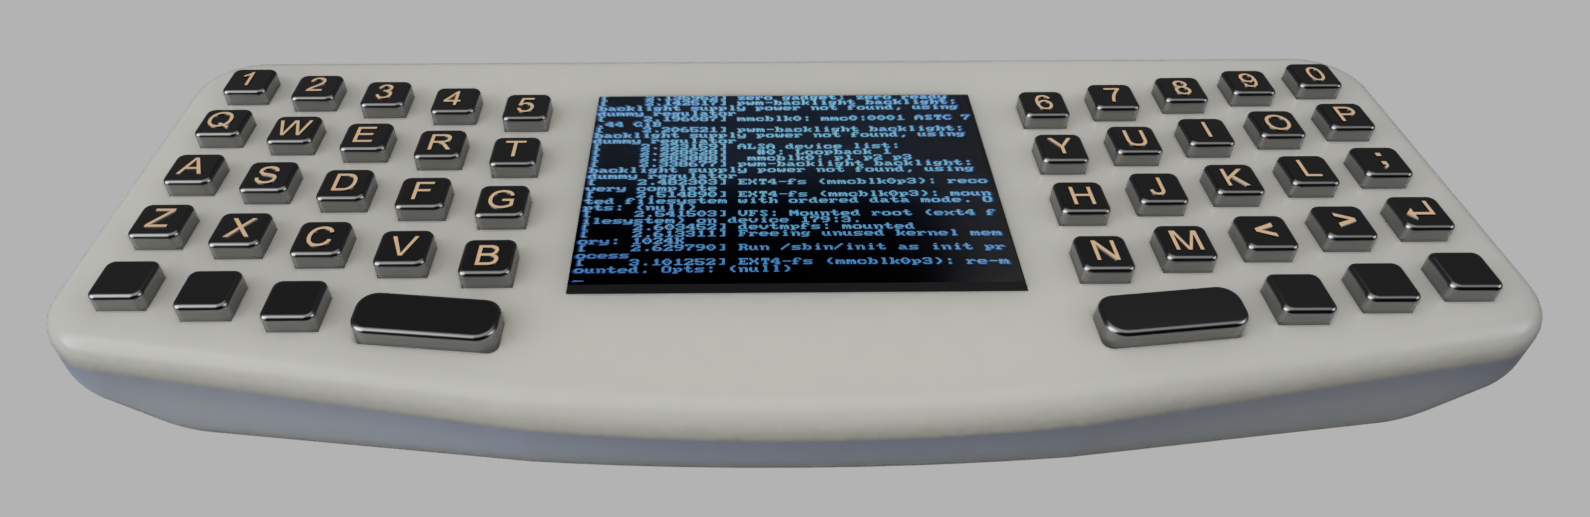
- 2.3” IPS TFT
- 320 by 240 pixel resolution
- ILI9342 controller (SPI)
- USB 2.0 over USB-A connector
- 5V to devices
- 48-key keyboard
- Silicone membrane, like a TV remote control
- Yes, you can type any character you want
- microSD card for storage
- How could you possibly fill up 64 GB of storage?
- 2x AAA NiMH battery
- The battery life is long enough
- Charge over USB C @ 500mA
- Licensed!
- There’s a few drivers I had to write for this, I’ll submit a patch eventually.
- Everything else is licensed as permissively as possible
- Even though Allwinner hates giving their code back.
- Yes ‘Open Hardware’ means more than PDFs of schematics
- No Audio Output
- Not just because it’s running Linux!
- I’m just not putting in an amplifier and a 1/8” jack.
- Low Price!
- It costs $10,000 USD to build one of these
- The ten thousandth one costs $15
- Designed for 2021
- I can buy all the parts right now, in quantity.
Design considerations
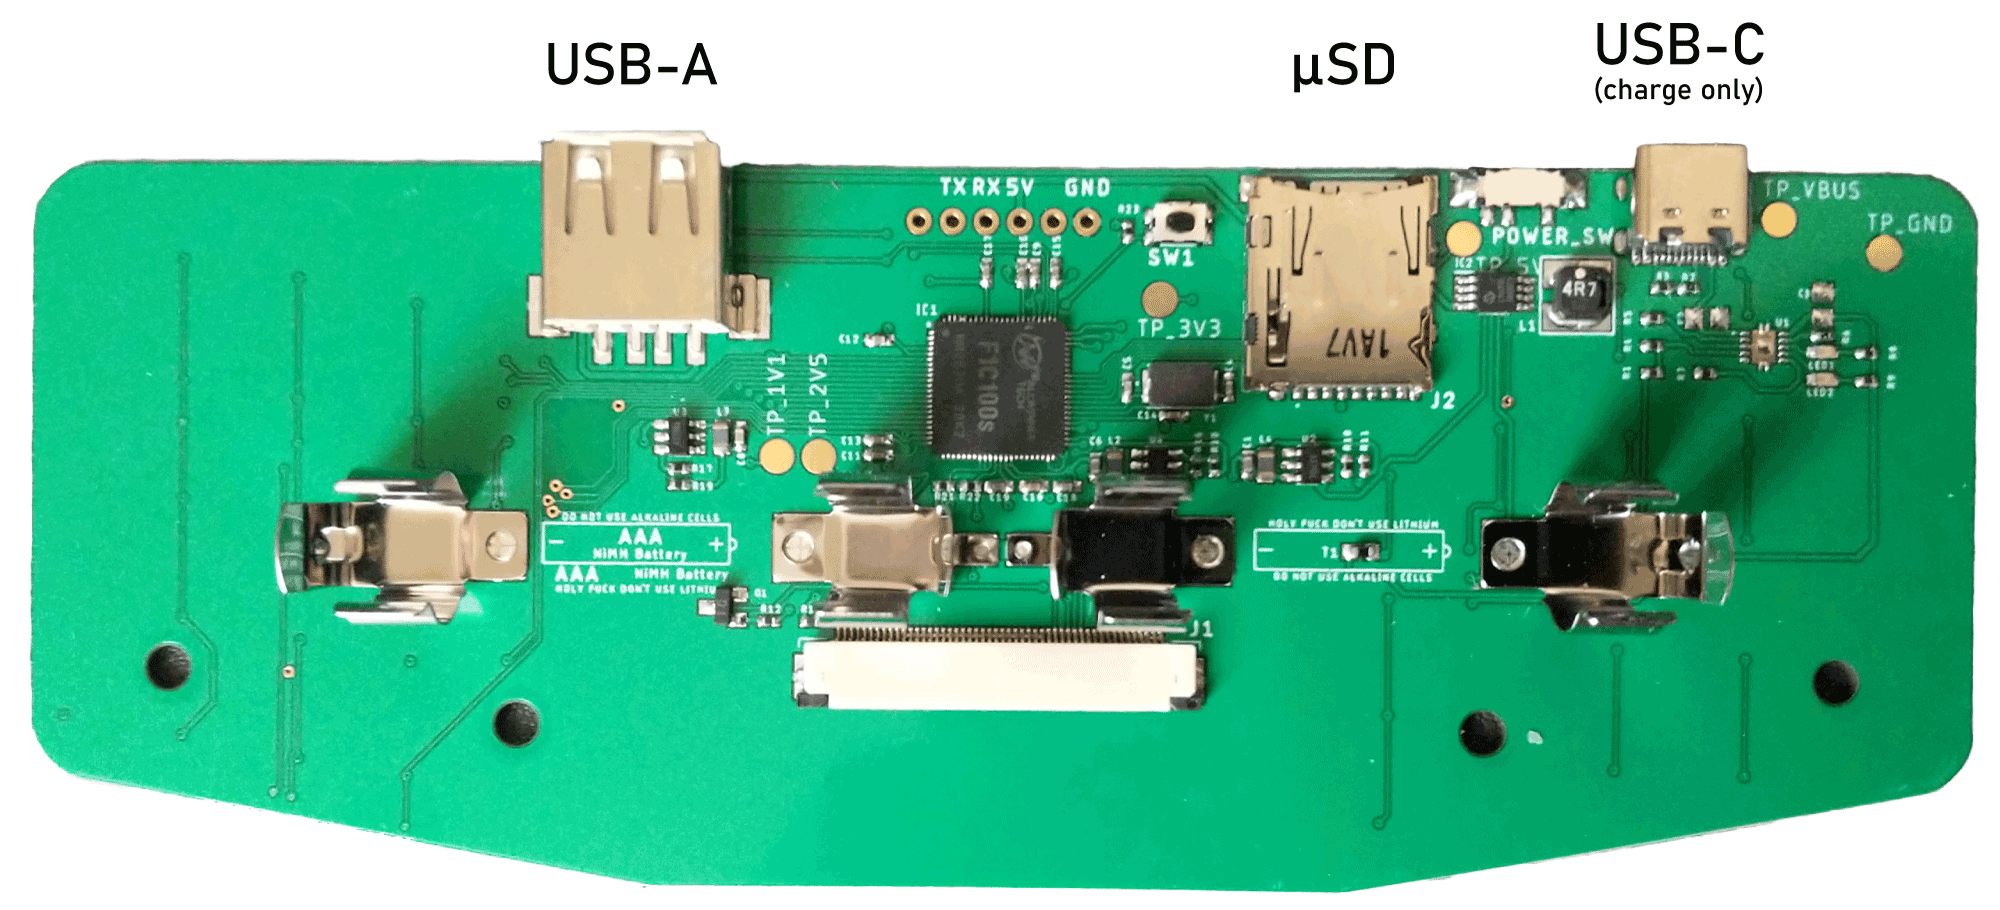
The most consequential design decision is the Linux SoC. For this I chose the Allwinner F1C100s, an ARM9 core running at 533MHz with an integrated 32MB of DDR (the F1C200s bumps the memory up to 64MB and is drop-in pin compatible).
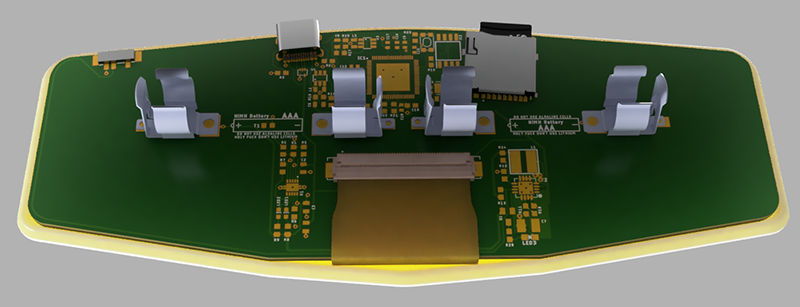
The schematic is based on a now-discontinued dev board, the LicheePi Nano and a board from Jay Carlson’s Embedded Linux series, with a few changes. Basic system bring-up is simple – just get three power rails (3.3V, 2.5V, 1.1V), add a clock and sprinkle some caps and resistors on the board. After that, you have a Linux console over serial. Alterations to the reference designs include changing the display connection from 16-bit RGB to SPI, deleting the SPI flash, and adding a microSD card. These changes were made to add additional GPIOs (for the keyboard) and to aid in programming and assembly (now everything runs off the SD card, flashing a ROM no longer required).
I have Buildroot running on this chip thanks to the efforts of others. It boots from an SD card and puts a terminal on a SPI display. Everything kinda just works thanks to some very cool people working on the sunxi stuff for Linux.
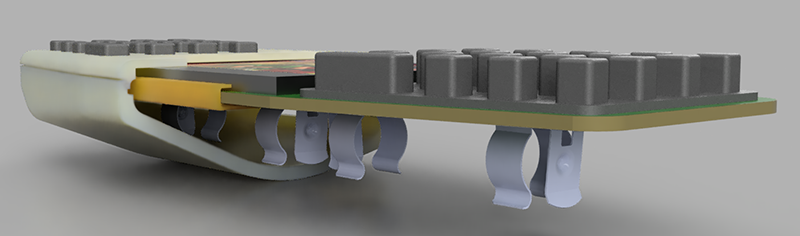
The design of the keyboard is unconventional, as a suite of tact switches would be expensive both in component cost and assembly cost. Instead, I’m using a silicone membrane keyboard, much like what you would find on a TV remote control. Because the electrical connections for the keyboard is printed on the circuit board, this type of keyboard is essentially free.
The silicone membrane keyboard does come with a drawback – it requires a plastic enclosure. That’s acceptable, as any ‘pocket computer’ device needs an enclosure anyway. My enclosure is a two-piece clamshell snap-fit design requiring no tools to assemble or disassemble. The cost is about $1 in quantity, and will be screen printed with alt keyboard combinations above each key.
Powering the device is challenging, as using lithium cells would mean more stringent requirements in regards to shipping and transport. Instead of lithium cells, this device uses AAA NiMH cells. While providing less overall power per unit mass of lithium, it’s significantly less expensive than lithium. This design can also be modified for AA NiMH cells for more than twice the runtime at the expense of a slightly thicker enclosure.
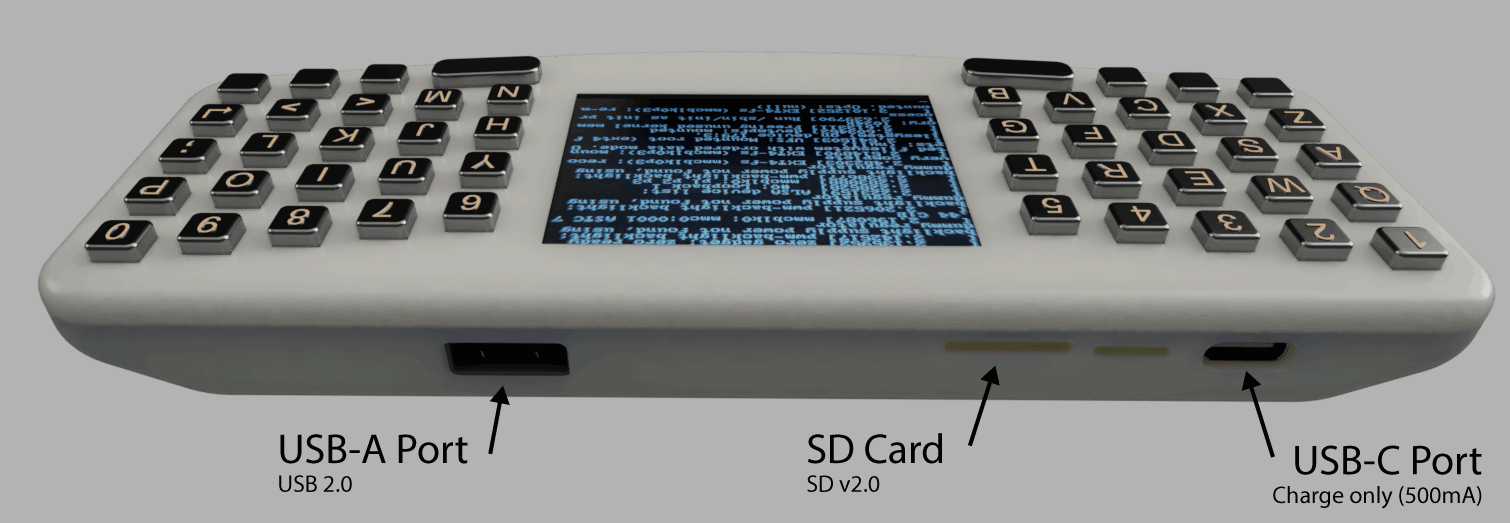
The ‘back’ or ‘top’ of the device contains all the ports. These include a USB Type-A port, where you can easily attach a WiFi or Bluetooth adapter, USB keyboard, webcam, or really any other device. lsusb works, so have fun with that.
The storage on this device is through a SD card – I’ve sourced a few 8GB cards and they work fine, but at scale 32GB or 64GB are more readily available. This is the second most expensive line item in the BOM, coming in at about $2/each at quantity 10,000.
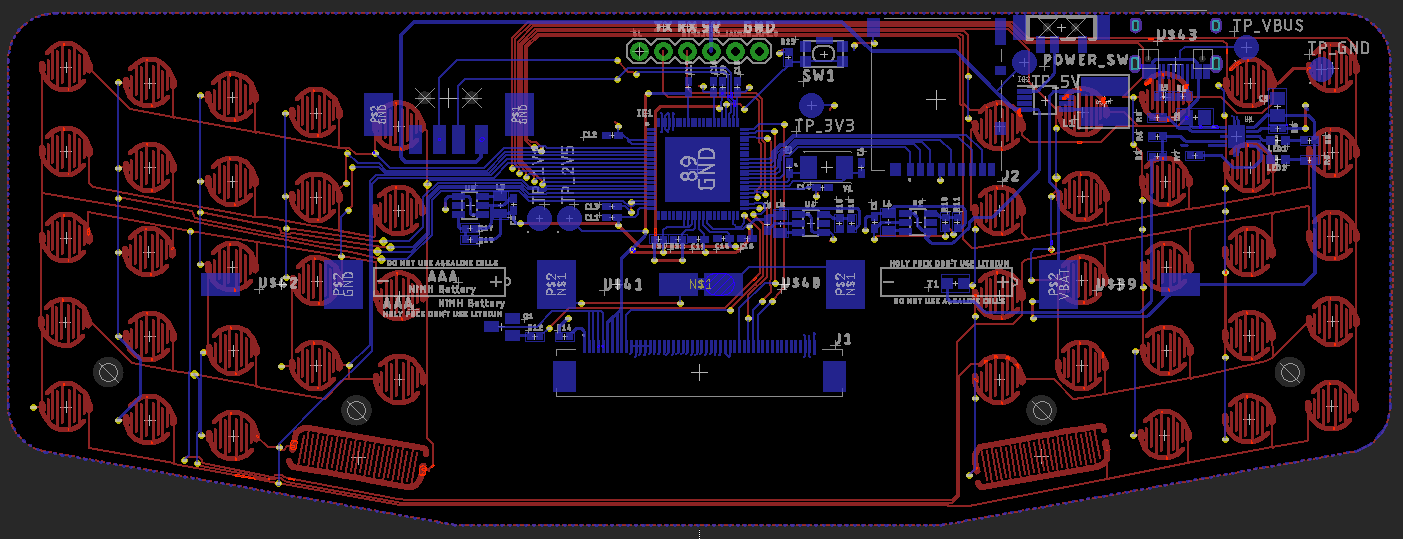
The PCB is a simple 2-layer board. There’s really nothing novel here except the contact pads for the silicone membrane keyboard.
Earlier renderings of the device
Does it really cost $15?
The answer to the big question, “How much does it cost?” is, “What the market will bear”. In short, yes, if you’re counting the BOM cost in quantities greater than 10,000. That said, let’s go into the cost breakdown. This is an abridged but still accurate BOM, with costs for each row in the last column.
| Device | Description | Cost @ QTY 1000 |
|---|---|---|
| CPU | F1C100s | $0.75 |
| Display | ILI9342 | $2.20 |
| Keyboard | custom | $1.20 |
| Enclosure | custom | $1.70 |
| PCB | custom | $2.00 |
| C1, C6, C8 | 22uF | $0.15 |
| C2, C3 | 1uF | $0.02 |
| C9..C13..C17 | 100nF | $0.0045 |
| C12 | 2.2uF | $0.0011 |
| C18, C19 | 1uF | $0.002 |
| Resistors (20) | Jellybean | $0.015 |
| IC2 | MCP1642B | $0.93 |
| J1 | Display conn | $0.52584 |
| L1 | 4.7uH | $0.31790 |
| L2..L4 | 2.2uH | $0.0126 |
| SW1 | Switch | $0.10 |
| Q1 | Mosfet | $0.16 |
| T1 | Thermistor | $0.10659 |
| Conn1…4 | Battery conn. | $1.10 |
| Type C | Type C conn. | $0.1894 |
| Type A | Type A conn. | $0.0496 |
| U2..U4 | MT3420B | $0.22 |
| Y1 | Crystal 12MHz | $0.12 |
| SD card | 64GB | $2.20 |
| Battery (2) | AAA NiMH | $1.10 |
| TOTAL $14.16079 |
There you go, a full Linux computer for under fifteen bucks parts. Assembly is not included, and better component selection (caps, another crystal, and a generic version of the battery clip) would drop a few cents off the build. But I’ll call this a $15 computer for the clickbait headline. Speaking of clickbait, if you want to build one of these things, It’ll cost you about ten grand. The first one costs ten grand, the ten thousandth one costs fifteen bucks.
I can buy all of the components for this device right now at the beginning of 2022, in the depths of a component shortage. Give me six months and I’ll give you a tens of thousands of these things.
What can it do?
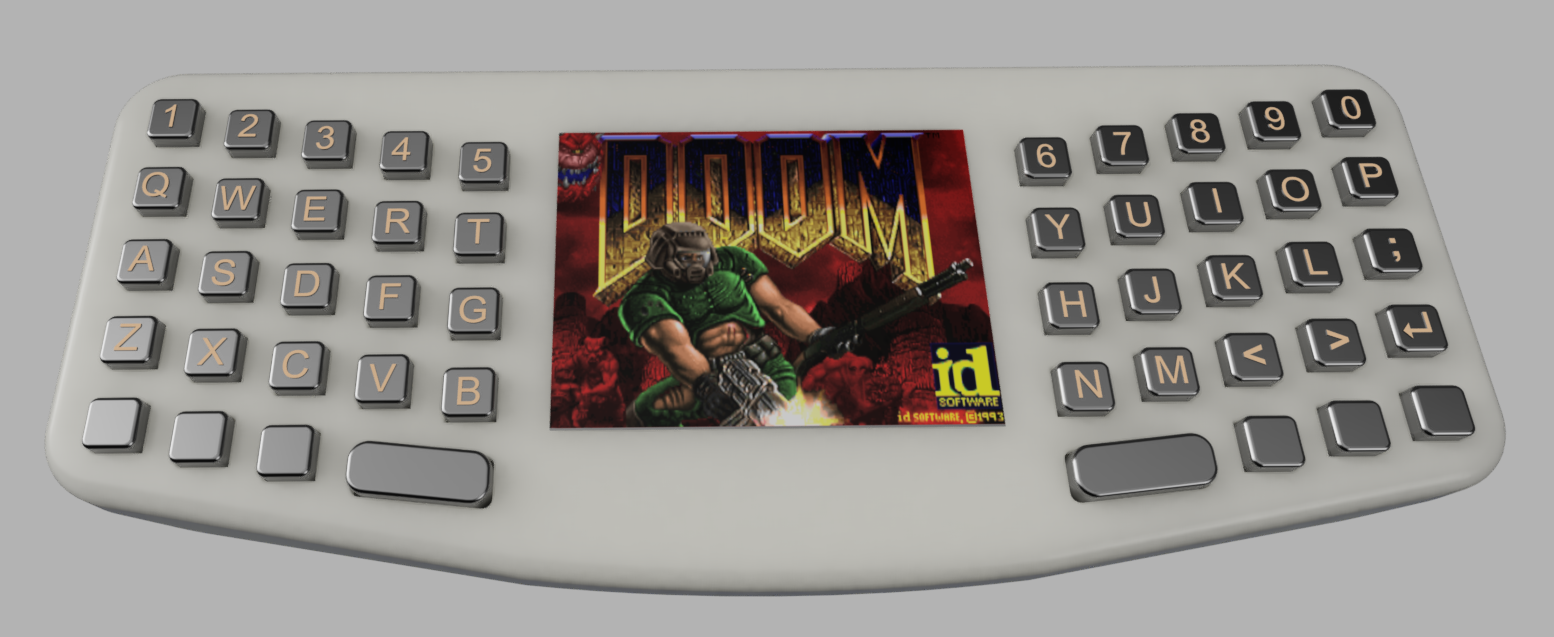
What can a $15 Linux computer do? First off, yes, it can run Doom. Chocolate Doom is actually a default package in Buildroot, which is awesome.
Instead of me telling you what this device can do, instead let me ask what you can do with command line Linux, a keyboard, and a USB port. Do you want software defined radio? Sure thing, there’s a package for that. Do you want this thing to be a crypto wallet? No problem, in fact you can display your expensive monkeys on the screen. Want to compile your own code on this thing? Go ahead. There’s even a few GPIOs left open and broken out, have fun with that. There’s one SPI and a few I2Cs that aren’t connected to anything.
This is, in short, a device that can do anything. It’s just really small and really, really cheap.
One thing I’m not even going to attempt is a GUI. You’re stuck with command line unless someone hacks something else in.
Design considerations and further work
This is not the final design for this device, because I do not believe there is any one design that can fufill all use cases. There are a few obvious things that could be changed, depending on what the user wants:
USB Ports
The current device uses USB-C only for power and charging, with a single USB-A port for peripherals (WiFi adapter, etc). This limits the device somewhat. The F1C100s only has one USB port but can do OTG, so a simpler one-port design is possible. This would enable the device to use USB Gadget mode, allowing it to act as a host or device. The pros and cons of this are debatable, and I chose the ability to plug in a USB WiFi adapter. Still, it could change.
A bigger display
The display is only 320x240, which is really too small to be used as a terminal. I believe the minimum resolution for a console is 640x480 or 800x480. I’ve already written a driver for a 800x480 display, and it could work over SPI. This display is somewhat expensive, with a bare panel coming in at $12, also necessatiating a larger enclosure with increased cost. Still, that’s an option.
A bigger keyboard
The current keyboard has 47 keys (space is duplicated on each side), which the mechanical keyboard mafia tells me is enough to completely replicate the function of an IBM 104 key keyboard. There are many, many more GPIOs available on the port I’m using for the keyboard. This device could support 110 keys easily, and even more by stealing pins from other GPIO ports. I decided against this because 47 keys is enough, and more keys cost more money.
Break out the GPIOs
There are a host of GPIOs that can be broken out to more devices. These GPIOs support I2C, SPI, I2S, UART, and even IrDA. While I’m limited by the form factor, I would really like to break these signals out into a useful header in future iterations. The only question is what format this header would take. I’m extremely partial to the Shitty Add-On spec I created, but finding the right connector to implement this is difficult. If anyone knows of a right angle, keyed, 2x3, female, SMD IDC connector, please email me. They simply don’t exist. Of course, since I’m already making the plastic enclosure I could engineer something…
In Closing…
Do I plan to make this thing available? Yes, eventually. If you want to see this go into production, ping me on my twitter.