
Milipixel: A Classic Mac Client for Vintage Digital Photography
What is Milipixel?
Milipixel is an online photo sharing app for classic Macintosh hardware focused on vintage digital photography. The platform celebrates the distinctive CCD sensor aesthetic of early digital cameras like the Apple QuickTake, Kodak DCS-420, early Sony Mavica, and Casio QV series. It’s Internet-aware, meaning you can upload your pictures to the web, download pictures from other photographers, as well as comment, like, and share pictures you find interesting. It’s Instagram or Flickr, if it was built in 1994, and available only for Macintosh computers.
This page details the Classic Mac client application that connects these vintage systems to the Milipixel.com platform.
Features
![]()
Viewing Experience
- Thumbnail Grid: A clean grid for browsing multiple images
- Detail View: Full-screen viewing of individual images
- Adaptive Scaling: Automatically scales images to fit window size while preserving aspect ratio
- EXIF Display: Shows available camera metadata (when present, which is not often)
- Slideshow: A full-screen slideshow of images, either random or your favorites.
Image Management
- Download: Retrieve photos from the Milipixel.com platform
- Upload: Send your own vintage camera photos to the service
- Local Storage: Save images for offline viewing
- Metadata Editing: Add titles and descriptions to your photos
Social Features
- Favorites: Mark photos you love
- Comments: View and add comments to photos
- User Profiles: See collections by photographer
Current Status
Milipixel client v0.9 beta is available for testing. The core viewing functionality is complete, with upload capabilities still in development. The application successfully connects to the Milipixel.com API using secure HTTPS connections and properly displays JPEG images from the most popular vintage digital cameras.
Download
You can download the current beta from:
The client is available as a Stuffit archive (.sit) with an Installer VISE package. Both 68k and PowerPC code is included in a single fat binary.
System Requirements
- Processor: 68030 or better (optimized for PowerPC)
- RAM: 4MB minimum, 8MB recommended
- System: Mac OS 7.1 through Mac OS 9.2.2
- Display: 512x384 minimum resolution
- Networking: Open Transport 1.1.2 or later
- Storage: 5MB for application, variable for cached images

Technical Implementation
The client is built for Mac OS 7-9 systems, with a particular focus on supporting the sub-megapixel digital cameras of the mid-to-late 1990s. It’s a native application written in C using Metrowerks CodeWarrior Pro 4, creating a fat binary that runs on both 68k and PowerPC Macs.
This was not developed in a VM; this was made on a real Power Macintosh G3 desktop and a bookcase full of Inside Macintosh volumes. It was tested on a Mac LC II running System 7.1 and Open Transport 1.1.2, with an LC PDS Ethernet card and 10 Megs of RAM. This is as close to real hardware as you would ever want classic Mac development to get.
Networking Stack
Making TLS Work On A Computer From 1991
Classic Mac OS lacks SSL/TLS support, making secure HTTPS connections impossible. I ported Mbed-TLS to create MacSSL, battling C89’s limitations (no method overloading, no variadic macros) and ancient file system constraints. This was painful, and about half of the total amount of work that went into Milipixel.
Inventing Randomness
I’ve discovered a great plot hole in an Asimov short story. If you’re wondering how to massively reduce the net entropy of the universe, forget about a computer trillions of years in the future. Just use one built thirty years ago.
The classic Mac OS has virtually no entropy for cryptography, giving me MBEDTLS_ERR_ENTROPY_SOURCE_FAILED errors. My solution combines system clock, mouse movements, file system data, and even screen saver timing to create just enough randomness to initialize the crypto subsystems. It’s not truly random, but it’s random enough to work. This should not in any way be considered secure, but it’s enough to complete an SSL handshake
Getting Let’s Encrypt To Trust Me
After countless handshake failures with cryptic error codes, I configured MacSSL to handle ISRG Root X1 and Let’s Encrypt R11 certificates, with custom ot_send and ot_recv functions for Open Transport. The full MacSSL implementation is on GitHub for other vintage Mac developers.
Image Processing
For JPEG decoding, I’ve integrated Aaron Giles’ JPEG library, specifically designed for Classic Mac OS systems. This optimized library provides efficient decoding even on 68k processors, allowing smooth display of images on systems ranging from an SE/30 to PowerPC machines.
OSErr DecodeAndDisplayJPEG(char* jpegData, long dataSize, short imageIndex) {
    OSErr err = noErr;
    JpegInfo jpegInfo;
    GWorldPtr jpegGWorld = NULL;

    // Initialize the JPEG decoder
    if (!JpegInit(&jpegInfo, jpegData, dataSize)) {
        return -1; // Decoder initialization error
    }

    // Create GWorld for the decoded image
    SetRect(&gImages[imageIndex].originalSize, 0, 0,
            jpegInfo.width, jpegInfo.height);

    err = NewGWorld(&jpegGWorld, 32,
                    &gImages[imageIndex].originalSize, NULL, NULL, 0);
    if (err != noErr) {
        JpegFree(&jpegInfo);
        return err;
    }

    // Configure and execute the decode operation
    PixMapHandle pmh = GetGWorldPixMap(jpegGWorld);
    LockPixels(pmh);

    JpegSetTarget(&jpegInfo, (unsigned char*)GetPixBaseAddr(pmh),
                  (*pmh)->rowBytes & 0x3FFF);

    if (!JpegDecode(&jpegInfo)) {
        err = -1;
    } else {
        // Create PicHandle for display
        GrafPtr savePort;
        GetPort(&savePort);
        SetPort((GrafPtr)jpegGWorld);

        gImages[imageIndex].picture = OpenPicture(&gImages[imageIndex].originalSize);
        CopyBits((BitMap*)*pmh, &((GrafPtr)jpegGWorld)->portBits,
                &gImages[imageIndex].originalSize,
                &gImages[imageIndex].originalSize,
                srcCopy, NULL);
        ClosePicture();

        SetPort(savePort);
        gImages[imageIndex].loaded = true;
    }

    // Clean up
    UnlockPixels(pmh);
    DisposeGWorld(jpegGWorld);
    JpegFree(&jpegInfo);

    return err;
}
Memory Management
Special attention has been paid to memory constraints common in vintage Macs. The application uses handle-based memory management and implements intelligent purging strategies to minimize RAM requirements:
void OptimizeMemoryUsage(void) {
    short i;

    // Make image handles purgeable when not visible
    for (i = 0; i < MAX_IMAGES; i++) {
        if (gImages[i].loaded && gImages[i].picture != NULL) {
            if (i == gCurrentImageIndex && gImageDetailsMode) {
                // Currently visible image - keep in memory
                HNoPurge((Handle)gImages[i].picture);
            } else {
                // Not currently visible - allow Memory Manager to purge if needed
                HPurge((Handle)gImages[i].picture);
            }
        }
    }
}
The UI
Milipixel supports a truly vast range of screen resolutions from 512x342 of the 68030 compact Macs (and the LC II I’m using for testing) up to 1024x768 and higher. By counting the number of pixels, the range of resolutions is nearly an order of magnitude. Today we can take for granted that a picture 1024 pixels wide posted to the Internet will look good – everyone’s screen is that wide, and if it’s not the operating system will scale it properly. Not so on the Mac! I struggled some time coming up with a user interface that would work as well with an SE/30 as it would with a Bondi Blue iMac.
The initial idea was to capitalize on the server-side resizing of 640by480.com. When uploading a file to the website, it resizes that image to two sizes – one with a bounding box of 250x250, and another with a bounding box of 640x640. If the aspect ratio is correct, this means I will get an images either 250x187 or 187x250, and 640x480 or 480x640. Displaying thumbnails on the smallest screen is of paramount importance, but unfortunately with a screen resolution of 512x324 I could only display two images at a time – not exactly an ‘instagram built in 1994’ experience.
I needed inspiration on how to lay these images out on a screen, so I turned to old Mac video games. Shufflepuck told me I could hide the menu bar to get a few extra pixels, and I was deeply influenced by Escape Velocity Nova with a main screen with a side bar for navigation. But none of these really worked until I remembered….
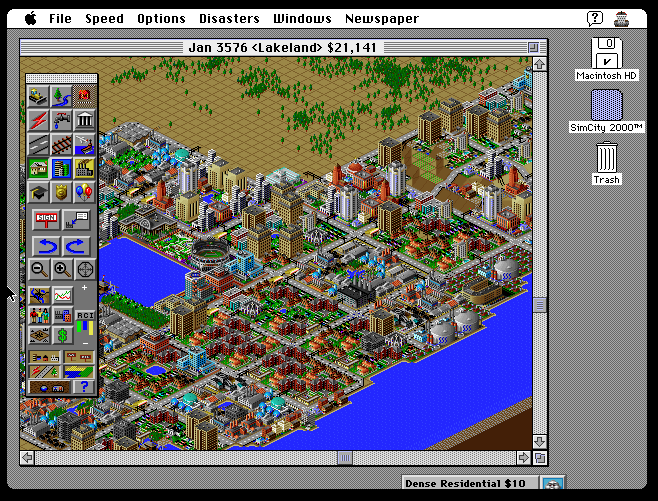
SimCity 2000. As a UI this is brilliant. At the top, there’s a menu bar, which gives me the File menu, a View menu, and even an Edit menu for copy and paste. The main screen is the map view, with scroll bars, and I can scroll around the entire screen. This window can be moved and resized. It’s exactly what I need.
![]()
The above render shows a 1:1 prototype of what I’m going for. All thumbnails will be rendered on a large canvas with scroll bars enabled. On small displays, this canvas will be scaled to 50%. On large displays, the thumbnails will be rendered at full size. Clicking on a thumbnail opens up a new window with the ‘detail’ view – the image at full resolution, along with the author, description, and whatever comments are attached to that image.
There is one downside to this approach. The canvas view will be rather large, at least seven or eight hundred pixels square. This is at least half a megabyte of memory, double that if we’re using 16-bit color. It’s a lot for the older systems I’m targeting, but this is how you do the UI for an Instagram clone built in 1994. I can’t figure out a way to do this that looks better.
Development Notes
This client represents a fascinating intersection of vintage and modern technology. While developing for Classic Mac OS presents unique challenges, especially in networking and memory management, it’s been rewarding to create software that gives these vintage systems new life in the modern internet landscape.
Future work will go into supporting the QuickTake camera’s direct connection capabilities, allowing direct import from camera to application to the Internet. Additionally, I may also add in support for MacTCP, obliviating the requirement for OpenTransport. I’m not especially confident a transition to MacTCP can be done, but I will investigate the possibility further.
About the Developer
I’m a vintage Mac enthusiast focused on creating software that connects classic machines to modern services. My other projects include GitRez, a GitHub client for Classic Mac OS, and Nedry, a recreation of the “UNIX system” seen in Jurassic Park.